Wednesday, September 18, 2013

More I spy goodness

I have been collecting I Spy squares to make quilts and other project for my kids and for gifts. I hope to be able to gift at least one I spy quilt for my nephew for Christmas. (Good thing he can't read yet, Hee Hee!)

I wanted to make a quilt for my youngest son with the things he loves, mostly cars, trucks, and everything else that moves! I found some great examples of I Spy Transportation quilts.

I found this one from www.blossomheartquilts.com. I love that the back of the quilt is a panel.

You can play I Spy with the front, and run toy car on the back! 

I also found this one at betteroffthread.com.

I would love to create a Transportation I spy quilt for my son, so to collect all the squares needed, I opened a swap for I spy transportation fabric. See this post if you are interested in collecting transportation charm squares for your own quilt. You can see selections of fabrics other swappers are submitting here.

Sunday, September 15, 2013

I Spy Transportation swap open!


This swap is now closed! What a great turn out! 

Have you heard of I spy quilts? They use novelty prints with all types of images a child would recognize and be able to play "I Spy" with. 
 I just discovered I Spy quilts and swaps, and have become a bit obsessed! I would really like to make a quilt for my youngest son, who loves trucks, cars, trains…. You get it, everything that moves! To collect a variety of squares for his quilt, I thought I would host my own swap.

One of the fabrics I have picked to swap. 

We will be swapping sets of 20, 5 inch charm squares of transportation related fabric. This can be planes, trains, cars, work trucks, bikes, tractors, or even shoes. In addition, street signs, railroad tracks, or any other transportation related items would be great.


Another fabric I am swapping. 


 You can swap more than one set, up to 4 sets (each set a different fabric). You should be able to cut 20 five inch squares from around 1/2 yard of fabric depending on the design spacing. Please make sure that the image is close to center on the square as possible, and fussy cut if needed.

Carefully rotary cut your fabric in to 5 x 5 squares. Be sure to remove the selvage from both sides. Squares that are poorly cut or wonky and cannot be used as received will be returned unswapped.

To brush up on cutting charm’s see this tutorial. http://www.ohfransson.com/oh_fransson/2010/05/charm-squares-101.html


Please send 100% cotton only quilt shop quality fabric. No Joannes, Hobby Lobby, or Wal Mart fabric. Mind the golden rule, send what you would like to receive. Also, keep in mind that the charms are designed to be in a child’s quilt, and should be recognizable to a child. 
Please post a photo of your selected fabric to our flicker group, and check out the photos before selecting your fabrics. That way we can avoid duplicates.


Place each set of 20 charms in a zip lock sandwich size baggie. Include your name, address, and flicker name on a piece of paper and put it inside baggies. Also include a self-addressed postage paid envelope for your charms to be returned to you. DO NOT use metered mail. (When I send off for swaps, I take the package in to be weighed with the return envelope in it, but left unsealed. I have them weigh it to determine the postage, add the postage to the return envelope, and seal up the package to send off.) You can get free flat rate envelopes from USPS on their website. They take a few days to arrive after order. 

I hope to have sign ups for at least 80 sets (4 groups of 20 sets), so we don't have duplicates. I will keep the sign ups open until Oct 1st, or until full. 

I will collect all the charm sets, distribute them randomly and return to you the same number of sets you sent in. I will try to not send out duplicates, but that will depend on the number of participants and how many sets you sent in.


At this time the swap is open to US residents only. If this works out, I’ll get brave and have another swap open to all.


The last day for me to receive the charms is October 18th, and will hope to get them back in the mail by the 25th. (Your own little trick or treat package!) I will update the list when I receive your charms. Anything received after October 18th will be returned to you.

To sign up, please email me at sweetiepgarden@yahoo.com or add a comment below with your email, flicker name, number of sets you would like to swap. 

I will send an email out with my address and any other information needed for the swap. I will also update the flicker page with a participant list and packages received. 

Thanks for playing! 

10/4 UPDATE: We still have room for a few swappers! If you are interested, please leave a comment or send an email with the number of sets you would like, your Flickr ID, and an email address to contact you with the swap shipping address. Please keep in mind that the charms need to be to my by Oct 18th so I can get them back out by the 25th as promised. 

Monday, September 2, 2013

I have been swapping like crazy.

So I have been absent form my little blog for a few weeks. Summer got busy, and the kids wore me out! Each night I would have a plan for making something I would blog about later, but it never happened. I never got the time...

Ok, I'll be honest. I signed up for that first I spy swap that I told you about, and was totally hooked! I found a quilter's forum, and signed up for another swap of creepy crawly fabrics as well as a doll Quilt swap. Then I found an i spy swap group in yahoo groups. I have gotten back one set of squares and sent off another with them all ready. I also did a flicker group swap of rainbow F8 to add an assortment of color to my little stash. I have been shopping, cutting, and mailing fabric all summer! 

I am addicted to swapping fabric. I have got to find time to create something out of the mass of i spy fabrics I am collecting. I have a great idea for making my nephew an i spy quilt, and I was thinking that making Boo Boo bags from novelty fabric may also be a good idea for the 6 1/2 inch squares I have. 

In the mean time, I found another swap at my fabric obsession, and was the first to sign up. It is an ABC swap, and I picked the letter "F" because I already have some flamingo fabric all ready for i spy cutting! 

Have you done a swap? I have to say it is just too much fun! 

Monday, July 22, 2013

Who knew swapping could be so fun...

or addicting!

I signed up for an I Spy quilt square swap a few weeks ago, and had so much fun picking out fabrics and looking at others selections. I got it all cut out, bagged up, and sent out. Then I went looking for another swap!

I have not even gotten back my first set of swapped squares, and I am out looking for more opportunities to trade fabric! I'm like a junkie. I am now on a quilting message board and a flicker group for finding swaps I look everyday for another opportunity.  I get all giddy and excited when I open up the quilt board or flicker group and find that someone posted something new!

I found a swap for "Creepy Crawly" fabrics, and I signed up right away. It is for 6 1/2" squares, but I figure I can cut them down to 5" and easily add them to the i spy squares that are also coming.

I actually had a hard time deciding on what to get for this swap. I was not sure if cute prints were wanted, or really creepy stuff, so I stayed on the creepy side. Want to see what I picked out?


First, the ants. For my 5 year old, ants are the worst of the creepy crawlers! (For the three year old Sweetie Ps, the most fun ever! I find them in the yard letting them crawl all over them. Eekk!)


I looked high and low at the fabric shop, and the frogs are all I could find, and that was in the Fat Quarter bin. 


Now the bats and the spiders are on the Halloween side, but that is hard to avoid when you are talking about creepy! 


I really don't know what to expect with this swap. Hopefully other were able to think outside the box better than I was. I can't wait to see! For this swap I submitted 12 squares for each of the fabrics, so I will be getting 48 squares back. That will make a nice addition to the 112 i spy squares from the first swap and I should be able to make at least two small quilts for Christmas. 

I better get started on that! 

Like I said, I have been searching for more swaps, and did sign up for a doll quilt swap. This makes me nervous since I will have to sew for this swap. I will be making a small quilt (12" x 12" up to 24" x 24") and swapping it with another quilter for a sample of her work. The theme is black and white with a splash of color. I started thinking about summer things that could work, and once it was in my brain, I had to participate in the challenge.

 Wish me luck! 

Friday, July 12, 2013

Charm swap

I finally got my fabric and cut it for the i spy charm swap. I should have it in the mail by Tuesday. I am so excited to get back a little bundle of charm goodness! And I can not wait for the next swap!

This is what I picked out:


Fun selections, right? I really like the butterflies. I have about a 1/4 yard left and I'm trying to think of a fun project for it. 


I was going to use this last one, but decided that the print was too large. Now I think I will use it to back a small i spy quilt I plan on making for my nephew for Christmas. 

Sunday, July 7, 2013

Beating the Heat Wave

The past week has been filled with over 100 degree days. I think it was 7 days of 100 to 111 degree forecasts, although I think the high for the week was 108. It really doesn't matter, over 100 is hot and hot is HOT. We normally have lows in the 60's over night, and are able to get up in the morning and open windows, but this week it was 90 degrees before the sun went up.

I'm not much of a hot weather girl. As a kid, I remember playing all summer, and LOVING any time I got in a pool. As an adult, I'm not great at braving the heat, and I burn easily. When you have kids, though, you have to get out. This week, it was hard to keep all the Sweetie P's occupied and happy, so I had to be a bit resourceful.

First, you have to have water play! The Sweetie's love to have the sprinklers on and the lawn was rather thirsty, so a few extra cycles were welcome.


Mr. Sweetie had cut PVC pipe and drilled holes in it so the kids could make their own water fountain creations to play in. Littlest Sweetie P thought it made a great drinking fountain.


But sometimes, just the hose is all you need to cool off and have fun. 


Now Mr. Sweetie can be rather creative with play. When we moved into our home last year, the previous owners left behind a slide. It is the type that would be attached to a play structure, but it was alone in the dirt. Mr. S cleaned it up, propped it on a latter, and made a water slide for the kids. 


While the Sweetie Ps thought this was great fun, I have to admit, I was a bit leery about safety. No accidents, only happy kids.

And of course, no summer with little ones would be complete without swim lessons. Not so great for Mom, since I had to brave the heat and wait for class to be over. We actually skipped one day because I could not take sitting in 108 degree heat. But learning to swim is important!


In the afternoon, we mostly stayed indoors, praying the the A/C could keep up with the heat. Staying inside means Mom has to come up with something to do or the Sweetie P's will watch Dora all day. 

I remembered seeing a pin on pintrest about an air fort.  It seemed simple enough, and the Sweetie P's love to play in forts. I simply weighed down the sides of a king sheet with anything I could grab in the play room, and then put a box fan on the open end. Turned it on, and the kids were amazed!


They grabbed pillows and blankets and loaded up the fort with all kinds of comforts for a few hours, off and on all day.

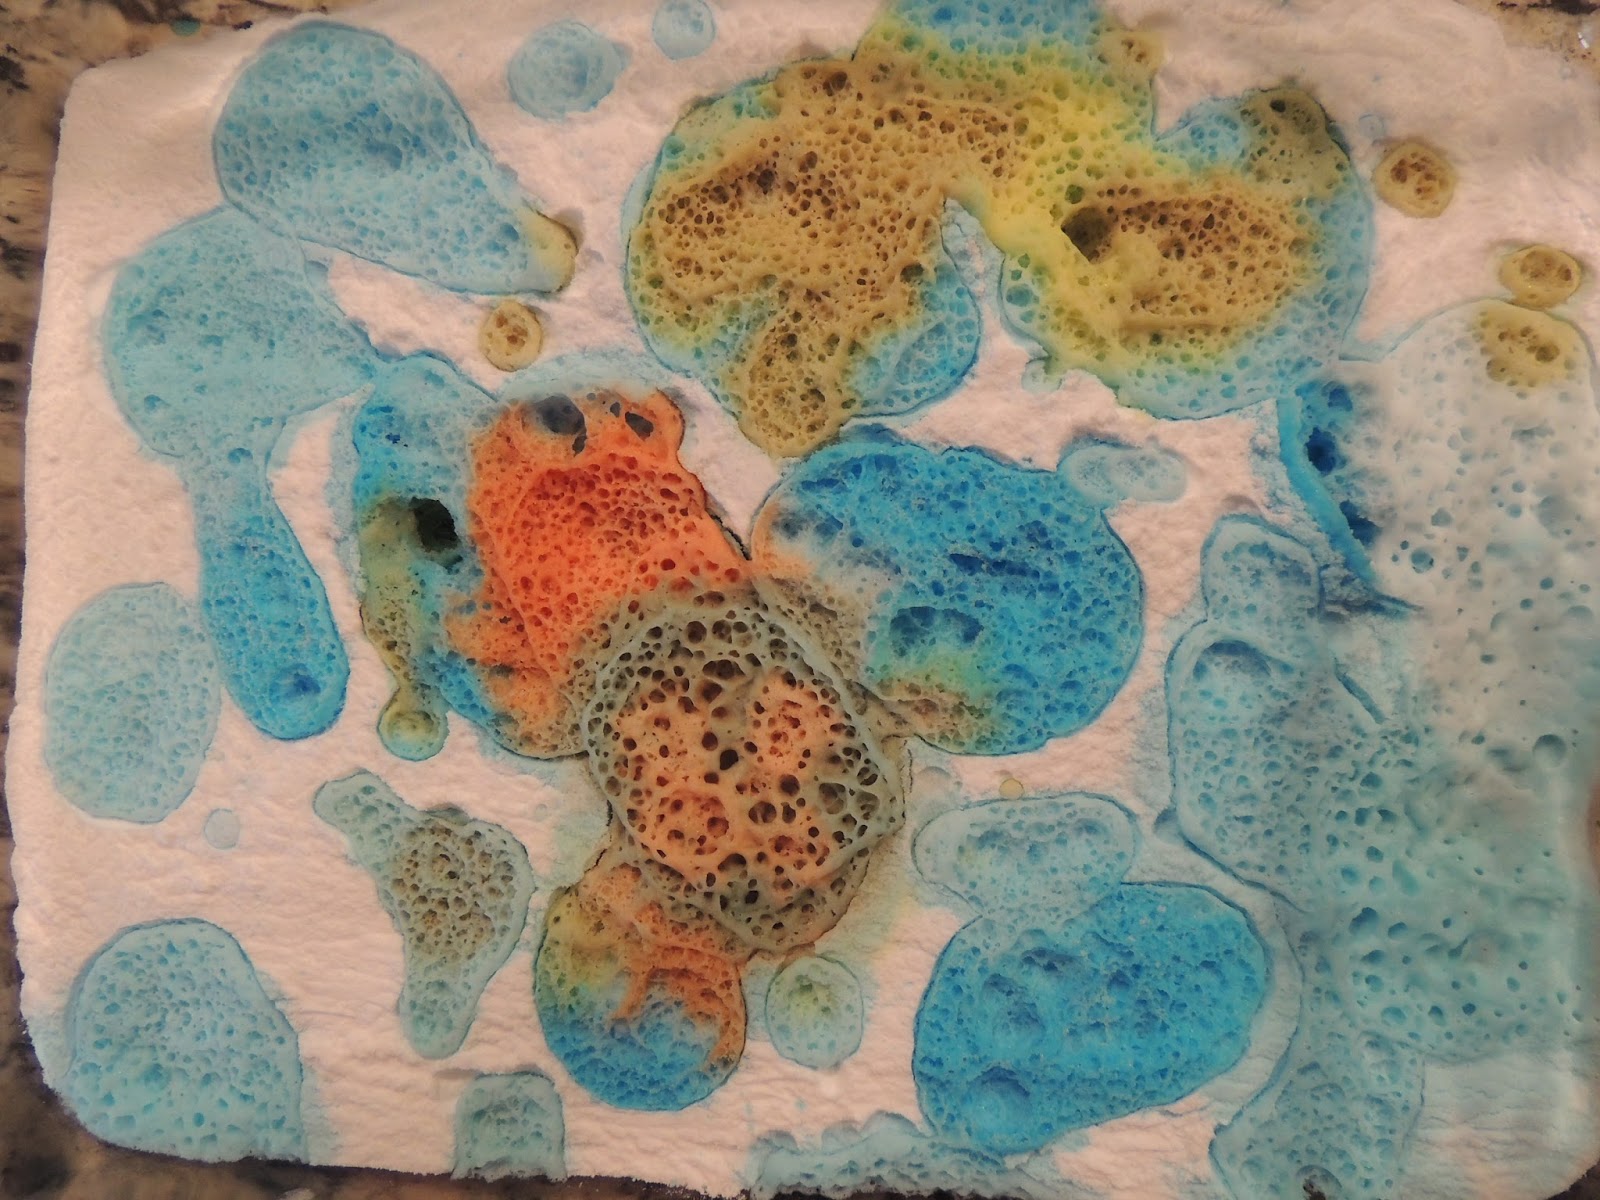
I took another pintrest idea, and had the kids drop colored vinegar in a tray of baking soda. I had picked up the baking soda at Winco in the bulk food section, so I got a bag for little cost. I scooped about 2 cups in each pan, and gave them droppers to drop in the colored vinegar.


 I asked the kids to mix colors and see what they came up with. Some how, brown was a favorite.
I had not planned to give the littlest Sweetie a try, but she was interested. She did, however, get more soda into the vinegar than the other way around! 
I had told my oldest it was a science/art project, so when he was done, he asked how long it would take to dry. He was not at all disappointed when I told him we would take a photo to save and dump the rest in the sink.

Over all it was a successful project,  fun for the kids and not too messy. They enjoyed the bubbles and fizz and watching the colors mix and change.

Now last, but not least. One of my favorite ways to cool off. Popsicles!
A few years back Mr. Sweetie invested in a Zuko Quick Pop Maker.


At first, I thought it was a lot of money for popsicles. I mean, you can just pop some juice in an ice cube tray and get some toothpicks, right? But I have to admit, this thing is fun! And, the kids only have to wait about 10 minutes for popsicles. I make them from juice, pureed fresh fruit and yogurt, so when they ask for a second, not only do I not mind, but I have it done before they finish the first! 


Something about popsicles and kids that screams summer! 

So, how are you getting along in the summer's hottest days?

Friday, July 5, 2013

Free Shutterfly prints.

I love a good bargin, and I love to put our memories and photos into scrapbooks. So I really love when Shutterfly is giving away free prints! Check out this for Shutterfly deals, as well as 101 free prints using code 101prints.

I have used this offer before. You just pay tax and shipping and you are good to go.  I have been reading that if you only order 99 prints, the shipping is a bit lower making it a much better deal per print. And I love Shutterfly for my photo printing. Quality is good, and ship quickly. When I did have a problem with some black and white photos coming out a little green, customer service was right on it. They suggested ways I could get a better quality print, and refunded the cost of the greenish prints ASAP.

I totally recommend them!

I use the 101 free print offers to get cough up on my kids books. I have been scanning my the oldest Sweetie P's Pre-k art work and now I can print it free and finish off his school year in the scrapbook! If getting the time was only so easy!

Example of Sweetie P's artwork. 

Wednesday, July 3, 2013

My first BOM square

With school out and summer in full swing, I have not had much time to get my craft on. Actually, I just keep falling asleep with the kids and missing my normal craft time. I finally finished my BOM square!

I learned a few things:

1. I need to remember to be more carful with the pieces I was using. I ended up sewing some of the 2 1/2 inch squares when I needed 2 7/8 white squares, and had to cut more. I should have cut and pieced the whole thing at once.

2. I am out of practice. Some of my seams must not be a 1/4 inch, since it is not laying flat and is a bit short on one side. I lost the foot I normally use, so that may be why I am off. (It actually fell INSIDE my machine, it you can believe it. I guess I need to fish it out!)

3. I need more sleep! Or maybe I just need to pay more attention to the directions. I had a problem getting the bottom red triangles in the right direction, and had to take it apart and re sew it. I hate redoing things. I have to say that the directions were clear and had great illustrations, I just had a brain outage.

I still think it came out all right, but I may end up making another in it's place. Practice makes perfect, they say. Since I had to recut a few pieces, I don't know if I have enough of the cream fabric for a second square. The Fat Quarter Shop is so generous with the fabric, that I will probably have extra at some point in the year.

Well, that's it. My first attempt! I can't wait for the next one to show up in the mail! It's like getting a homework assignment. They send me something to do that I didn't pick out or in vision, and I complete the task as asked. Only, I give myself a grade and get to keep the finished work.

My grade today, I'd say a B-. I'll do better next time, I promise.

Friday, June 21, 2013

My first BOM from the Fat Quarter Shop.

I started sewing again just before Christmas. I was great to get my machine out after a 5 year break. I used to make quilts, but now I don't have much time or space to get s project like that done. I am always rather afraid that the Sweetie P's will find my pins or scissors and get hurt as well.

Anyway, after making some gifts for Christmas, I got the creating bug again. While looking through pintrest for projects and such, I discovered the Fat Quarter Shop. They had a mystery block of the month starting in a few months, so I signed up. I figured, I could make a block each month, especially if they picked out the fabric for me. As a bonus, I only had to pay for a portion of my quilt at a time.

Well, months went by, and I had actually forgotten about the membership in the Block of the Month club, until my little package arrived the other day. It was so much fun, like getting a little gift in the mail! And the fabrics are so adorable!

So far, I've only gotten time to cut the fabric.

 I really like this collection. Look at the sweet little cherries...


I can't wait to get it all together! 

The Fat Quarter Shop is very generous as well. Take a look at all the fabric I have left over! I'm sure I could make a second block, and maybe even a third! 


Oh, and they also included a mini charm pack of the entire collection! How awesome is that? 
  It is so adorable! 

I hope to get the first block pieced together this evening, so hopefully I'll have a photo of a finished block to add this evening. 


Monday, June 17, 2013

I spy quilt

I happen to be looking at the Fat Quarter Shop facebook page, and found a comment posted from  heartathomemama about an I Spy quilt block swap.

from Obsessively stiching

An I spy quilt has lots of different squares depicting things the kids can search for and find in the quilt, like the one above.

I think I love the idea of an I spy quilt for my kids, and also maybe as a gift? I have already started my Christmas list and projects, and this could easily be added and finished by Christmas.

 I just started using my sewing machine after a 5 year break, so I don't have a stash to pull from. To pull off a quilt like this, I would have to buy a collection of I spy fabrics, buy each fabric (that sounds like an expensive prospect) or join this swap. I'm leaning toward the swap, but right now I fell like I have a lot of projects going on and have purchased fabric and scrapbook supplies that have yet to be used. I did, however, take a look at some fabric online, since I have so little time to get out and shop. The Fat Quarter shop had a few selection in the 50% off section that would work, and after postage, it would still be a deal for enough fabric for two small quilts.

Oh maybe I should just do it!

Edited to add: I did sign up! In fact, I signed up twice, so it looks like someone will get a quilt for Christmas! So stay tuned, I'm sure you will see my progress in future posts!

Monday, June 3, 2013

I'm no longer on the fence regarding the use of spray sunscreen.

I have been on the fence about using spray sunscreens. On one hand, they are super convenient when trying to protect four kids from sunburn, and can make the process much quicker. On the other hand, I'm never sure how much they actually are covering them, and the smell is awful! I have also read about concerns that the spray being inhaled by our little ones is harmful to their lungs. (See how-safe-are-spray-sunscreens)

I don't have a lot of chemicals in the house anymore. With 4 little ones, it is hard to make sure that they are safely stored, so I just don't have them around if I don't have to. I have stopped buying a many of  the cleaning products and opt for lots of vinegar for disinfecting and baking soda for scrubbing.  Sunscreen in a must for the summers outside, but the spray?

My mode of operations for park visits or other outdoor activities has been to lotion up before we get in the car or wagon. When we get to the park, or activity, I will sometime spray them down (mostly on the back of the neck and legs) as they exit the car. While at the park, I sometimes get a little spray on if they have been playing in the water or I am feeling like they need more protection.

Today, as I was trying to get the littlest Sweetie P lathered up in the backyard, one of the twins found the bottle of spray sunscreen. The next thing I knew I had a Sweetie screaming because he got sprayed in the eye.

It was awful! He was crying and yelling and really hurting. I took him to the bathroom and flushed out his eye with water, and that made him more upset. He was crying, I was crying, we were both a big fat blubbering mess! I can only imagine how that must have felt. His eye was an irritated crazy red and his face so sad and hurt. After 10 or 15 minutes of trying to get it cleaned out, hugging and crying in the bathroom, I let him watch TV for a little bit. He was OK, but I was really not.

I am going to ditch the spray all together and keep the Sweetie P's eyes and lungs safe. I think it is worth the extra time to slather on the lotion, to make sure they are totally covered, and get a little time to pamper each one in the process. Somethings are not worth the convenience.

After reading the link above, I'm also going to check out chemical free options for sunscreen. As much as we seem to use in the summer, I think it would be worth it to look into even safer mean of sun protection.

Friday, May 31, 2013

My Mother's Day Aprons


My niece just got her first apartment, and I wanted to get her something for a housewarming. I know that she was able to outfit the apartment with most of the things they would need, so I wanted to do something fun. I decided to make an apron, searched pintrest for a pattern and found  this great pattern from Stop Staring and Start Sewing.  .

It worked out great, and I became a bit obsessed with aprons (I ended up making two for myself). With Mother’s day approaching, I thought I would make a few more for my Mom, Mother in Law, and Aunt. I wanted them to be a bit more ruffled and gathered, though. So I modified the instructions a bit.

They turned out great, and like I said, I made a few for myself as well. I think aprons may be a new obsession for me!

So this is what I did....


Instead of using a fat quarter, I used a quarter yard so it measured approximately 18 inches by 40 inches.

For the ties and bottom ruffle, I needed four 6 inch X 42 inch strips instead of three. You could really use three if you what to shorten the ties and tie in the back instead of the front, but you would end up with a seam in the middle of the front.

I put the bottom piece on just as the tutorial stated, using an entire 42-inch piece instead of 22 inches and finished the sides.

After sewing the remaining (tie) strips together, I found the center and marked it.  I then marked the center of the apron and pined the centers right sides together.

I laid them out on my work surface just below my quilting ruler. I wanted the apron to be 22 inches wide, so I placed the 11-inch (center) directly above my center pin. Next, I pined the end of each side of the apron at the 0 and 22 inch points of the ruler. This way, I knew the apron would be in the center of the ties and would also be 22 inches long.


I then began to pin the rest of the apron to the ties. You can just pin as you go so that the apron ruffles. I found the center between two of the pins, and then pined it to the tie between the last two points pined. I just kept doing that until the whole thing was pined on. I sewed the apron to the tie, and then followed the tutorial instructions to finish.

Look at the finished aprons modeled by my Mom, MIL, and my Sweetie Husband!


I was short of fabric when I made the one on the left (in brown) so I made a larger brown strip at the bottom.

All the ladies LOVED them, especially my niece. I wish I had a photo of her cute apron but I failed to get her to model it!  

Thursday, May 30, 2013

Please let me introduce myself....


So a few days ago, I FINALLY made my first blog post. I had actually been talking about having a blog for months, been planning posts in my head for weeks, and even signed up for the free blog on blogger days ago. I was in my kitchen watching my kids on the computers and said to myself, “Now is a great time to get that first post done”. I finished it after bedtime and posted that puppy!

Now, I’m going to take a step back and tell you why I wanted this blog, and what I want to do. A year ago, I discovered pintrest, and became obsessed with all the projects that I was finding for my family and myself.  For Christmas, I made beanbag chairs and aprons for the Sweetie P’s, tried new recipes, and gave the Sweeties new art projects and activities to do. It was awesome.

But after awhile, I felt left out of some of the fun. I wanted others to see how MY projects turned out, how I tweaked them to work for us, and stuff I came up with all on my own. I wanted to brag about my work as I had read others doing. I wanted to be pined in pintrest!

So here I am, attempting to fill some blog pages with my own homespun creativity. I’d like to include my attempts to get the Sweets to eat better, my attempted quilting and sewing projects, cool stuff I do for the kids, and my obsession documenting our lives with Project Life. I hope others will enjoy some of it, but really, it is a place for me to brag a little about myself, and give me something to keep my brain busy.

Why did I call my blog “My Sweetie P Garden”?  Well, I have four children, and I lovingly call each of them “Sweetie P” all the time. Our first born (Big Sweetie P) is 5, the twins (Middle P’s) are 3, and our bonus baby (Littlest SP) is a year old. We are busy around here!  They are all growing, like a garden (get it, LOL).

Big Sweetie Eli with his little brother Declan

Delilah with her littlest P Campbell
We also have a Sweetie P Garden in the yard, but that is for another post. 

Tuesday, May 28, 2013

"Healthy" Oatmeal Pumpkin Cookies


I found a recipe for "healthy oatmeal pumpkin cookies"  here. They sounded great, and I said to my self "maybe my Sweetie P's will love them, too!" So I baked up a batch, and they were gone in no time! 


I wouldn't really say the recipe is "healthy" ... not that I am a real expert or "into" health food. My Mom , on the other hand, has been in and out of health food since I can remember. She is always telling me about the great for you foods that she is finding out about. I have picked up a few habits from her (good and bad) over the years. I used some of them to make the cookies more "healthy" in my mind, anyway. 

I started out by using whole wheat flour instead of white, and cranberries for the chocolate chips. Don't get me wrong, I put chocolate chips in all kinds of foods to make them more fun for the kids so they ignore they have pumpkin or zucchini or beets in them. In this case, though, the cookies don't need the chocolate so all the better with cranberries! 

I also used coconut oil instead of margarine. Like I said, I'm not into health food, but I have heard some nasty things about margarine, so normally I use good old fashion butter.  My aunt was moving across country a few months ago and gave me her stash of coconut oil so I could give it a try. It is supposed to be better for you and I even heard that it can be helpful for memory. It worked out great in muffins I made with pineapple, (not to mention helped to clear up one of the Sweetie P's eczema when I slathered it on his knees) so I bought a big'ol tub at Costco. It also smells great when baking. 


Last but not least, I cut the sugar from 1 cup to 2/3 cup. With the sweet cranberries, the cookies don't need it and the Sweetie P's are sweet enough! 

So, this is what I did...


2 cups oats, uncooked (quick or old fashioned)                                                                                 1/2 cup coconut oil 
1 cup canned pumpkin   
1 egg   
1 teaspoon pumpkin pie spice
1 cup whole wheat flour
1/2 teaspoon baking soda 
1/2 teaspoon salt                                              
1 cup dried cranberries


Note: The only reason I left out the O.J. is that I didn't have any on hand. 

Pre-heat oven to 350.

I started by mixing the pumpkin, coconut oil, egg, and sugar in the mixer.  Next, add the oats and mix. 

I mixed the flour, baking soda, pumpkin pie spice and salt in s small bowl, then dumped it and a mixed well. Stir in cranberries. 

I lightly sprayed the cookie sheet with Pam, but I'm not sure you need it. Using a small scoop, I plopped a dozen cookies onto the cookie sheet and baked for 12 min or so. They were soft, but I made sure they were cooked in the middle. 


You'll notice that some of the cookies are flat, others in the hump shape of the scoop. My biggest "SP" like to have them flattened, but sometimes I forget. 


I got about 2.5 dozen for the recipe, and half were gone before  I got the last batch out of the oven!